People often think that small business owners spend all of their time doing creative things. Some days are like that. More days are spent in doing, well, business things. Actual production makes up about 25% of my time, and most of those production hours aren't the truly creative kind. Making new things takes up only a tiny fraction of that 25%.
I enjoy all of the business things, but wish I had more time to be creative.
Enter Amy Warden's Soap Challenge Club! I found Amy's Soap Challenge club in 2019 and have entered here and there, but mostly I'm a lurker. I almost always make a soap for the challenge, but rarely make it in time to enter.
I want more creativity this year, so I have actually set a personal goal around completing the monthly challenges more often and sharing my attempts - both beautiful, and not so beautiful - with all of you.
So, without further ado...
January's Soap Challenge Club Entry
About the January Tutorial
This month we learned how to create beautiful soaps using the Hanger Swirl Technique. If you're reading this, you have more than likely seen a Hanger Swirled soap and may have one in your bathroom right now! This is probably one of the most recognizable techniques, and there are almost an unlimited number of ways to swirl.
In general, you fill a loaf mold with soap, layer colors into the soap mold in any number of ways. Then, using a soap hanger (an object as long as your loaf mold), you swirl the colors together.
Easy! Peasy! Um...maybe? This is absolutely a technique that gets easier the more you practice and knowing how to manage trace is key.
It's always easier when you don't tip the mold over trying to get videos!
We almost had free range soap!
How It Was Made
Let's start with color choices. I owe the folks at Nurture Soap a huge thank you for their color sets. I rarely make soaps with so many colors but wanted to make something really bright and happy because January in Maine is not the brightest or happiest month.
Instead of obsessing over color choices, it was easy to pick the "Feelin' Groovy" mica set already in my mica stash (Hello, my name is Dawn, and I hoard mica...like a giant dragon on a pile of sparkly gorgeousness...my preciouses...).

Thank you to Nurture Soap for not only sponsoring this month's challenge, but for also feeding my mica hoarding tendencies.
I started by mixing each mica in olive oil to minimize the amount of stick blending. I wanted this batter to stay at light trace as long as possible.

I made the soap batter using my usual method. Melt the hard oils and butters. Add the liquid oils. Add the cooled lye solution to the oil solution and stick blend. In this case, I soaped at room temperature because I was worried the soap would trace too quickly. Pouring and swirling take time.
After adding the fragrance oil (Persephone's Kiss - also from Nurture Soap), I split the batter into an uncolored portion and seven smaller portions. I lightly mixed the same amount of prepared mica into each portion.

With the mold tilted at a slight angle, I started with a layer of uncolored soap, and then began pouring soap down the side of the liner (called a "wall pour"). Alternating colors, I poured about half of each portion.

Then I poured a layer of uncolored soap to cover all those bright, happy colors. I intended to continue layering the other half of the colored soap batter using the same wall pour method, but at this point, the soap was starting to get a bit thick. The rest of the pour was a combination of wall pour and Splop & Pound.

The Splop & Pound method is my own technique for splopping soap by spoonful into the mold as fast as I can before it gets too thick to swirl while also pounding the soap mold on the table occasionally to release air trapped in those thick soap layers.

You can always tell when a soap is made using this technique because the soap table looks a right disaster. Thankfully, I can crop a photo like it's my job!
After the pour, the hanger was inserted, and I completed what I believed to be too many swirling passes in soap that I believed was too thick to allow for graceful color swirls. As I was slamming the mold down on the table for the last time, I said my Soap Challenge Mantra aloud, "well, at least it will be soap!"
I finished with a splopped layer of uncolored soap. By this time in the process, any attempt to create a textured soap top was off the table. The soap was just too thick. In an attempt to improvise, adapt, and overcome, I sprinkled a bit of that leftover mica in oil on the top and tried to drag a chopstick through it.

At least it will be colorful soap.
After a spritz of alcohol, I covered my little soap loaf and let it saponify without a peek for almost 48 hours. Not even a single peek...the hardest part of Soap Challenge Club - waiting for the cut. Also, I didn't peek because I was afraid it looked like volcanoed alien brains.
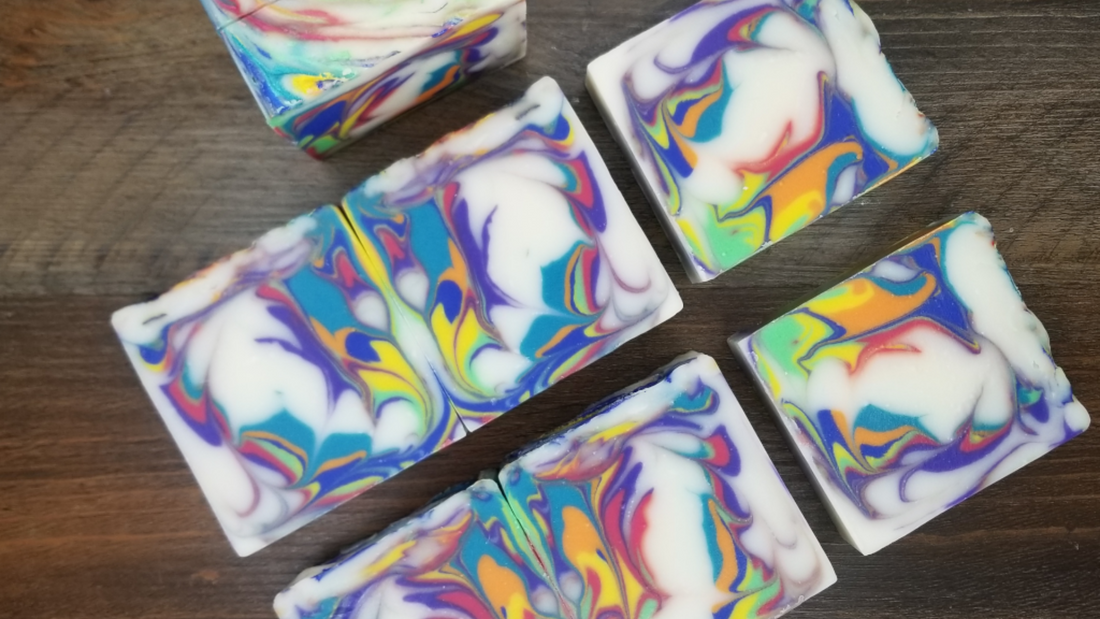
The Cut
And this is why I continue to make soap. Before cutting this, I told the people (and pets) in my house that I wasn't going to be disappointed because it will be colorful soap that smells nice. They've heard all of this before. It's my Soap Challenge Pep Talk and usually occurs just before the cut.
I expected a mish mosh of indistinct swirls and muddy colors peppered with air bubbles. I was pleasantly surprised!

The photos are always the hardest part!
Now, don't think I'm tooting my own horn here (ok, I am just a little bit - these colors are so happy!). I've already seen so many beautiful entries (you'll find some astounding talent if you follow #soapchallengeclub on Instagram). The designs you can make with this technique are nearly unlimited, and I know voting is going to be tough (as always!).
Soaping will keep you humble, but it will also surprise you. You can almost never predict how new things will go, but if you take the chance and play a little bit you might find something surprisingly colorful comes out of what you originally thought was a right disaster.
Have questions? Did you try the challenge yourself? Drop a note in the comments below - I'd love to connect with you!
2 comments
The pattern and colors make me think of dragon wings and flames. Looks beautiful!!!!
Oh, I love a good soap cutting surprise!! This is definitely a happy soap and very beautiful indeed! Great to know you are planning to enter more challenges this year, Dawn – I’ll hold you to that! Excellent write-up for a beautiful hanger swirl soap!